
There’s already wide array of great tutorials in Unity for creating an UI for your game ranging from very basic tutorials on how to drag elements such as images and controls such as buttons to your user interface to more advanced stuff like using them in the world space.
The newer UGUI system is very flexible which is great if you know how to use it, but can cause a lot of unnecessary problems and re-work if you don’t. In this tutorial I am hoping to pass on some of the experience I have gathered while working with the system and NGUI for 3 years or so.
Setting up the Canvas
Personally I dislike how the Screen-space overlay setting in the canvas works by using 1:1 pixel to meter scale to define the physical size of the user interface. This makes it ridiculously big in the editor and personally I find it difficult to work with, so I always go for the Screen-space Camera setting which allows me to attach the canvas to a camera object that’s dedicated for displaying the user interface. From there I can manipulate the physical size of the Canvas by adjusting the plane distance.
I also set the culling mask from the attached Camera to only render the UI layer and remove it from the Main Camera so that it doesn’t get rendered twice.
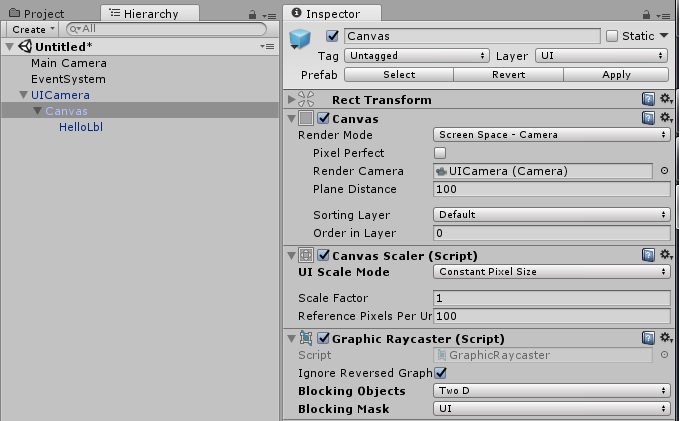
I also set-up the Graphic Raycaster to block only 2D objects in the UI Layer because more often than not the User interface elements are two dimensional. Rect transform values in this case are driven by canvas so they cannot be altered. The child HelloLbl is just a text element that I placed under the canvas.
Canvas Scaler
The canvas scaler attached to the canvas is a handy tool which defines how your user interface behaves on with different resolutions and aspect ratios.
If you’re making a game for desktop computers then I recommend you to use the constant pixel size mainly because displaying images on their intended size just looks better than if they where shrunk or stretched. With players using something as precise as mouse and looking the screen from very short distance smaller user interface is actually preferable with higher resolutions. For those who don’t you can add a setting to the settings window to alter the scale factor to make the elements larger.
For mobile games and maybe console games I would recommend using the Scale with screen-size and using reference resolution that matches the resolution of popular smart-phones or using the standard FullHD (16:9) resolution 1080 × 1920 for portrait and 1920 × 1080 for landscape. Mainly because touch inputs are not as precise as mouse clicks and this could make small buttons and sliders difficult to manipulate on a device that has very high resolution in comparison to it’s screen-size. With home consoles users maybe as far as 3 meters (10 feet) away from the TV which can make small text in your game very difficult to read.
Scale-with screen size also comes with Screen-match mode which is useful for dealing with different aspect ratios. It defines how the screen-height and screen-width affect the scaling in your game. It’s good to play around with it a bit using the Free-aspect setting in Unity editor and trying different aspect ratios and how it affects your user interface.
There’s really no silver bullet for it as it depends a lot on whether you want to use portrait or landscape or both on mobile and whether you have a lot of elements with anchors using horizontal or vertical stretch.
Creating new UI elements
Usually the best way to start creating a new element is to add a new rect transform to your canvas that can be used to specify the size and position of the element. This can be done by:
- a) adding a new empty game object to your canvas (select canvas -> right click -> create empty)
- b) adding new image game object to your canvas and removing the image component.
Like in my previous tutorial on intractable elements I like to keep the parent element as clean as possible from unnecessary components. Personally I like to separate even the background of the element and just set it to stretch to the size of the parent element.
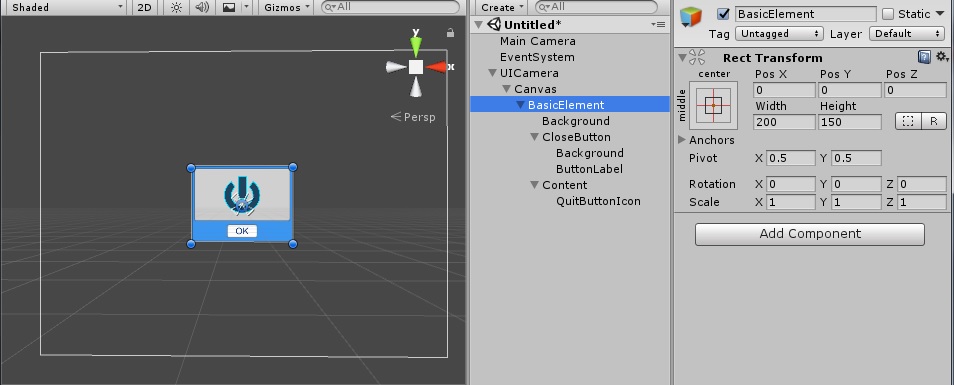
Basic Element here is the Root element and it has 3 children one being the blue background, second being the close button with label “OK” and last being the actual content.
Importance of Anchor and Pivot points
Anchors and Pivot point play a major role in displaying your user interface properly on different resolutions. For example if your element is supposed to be displayed on the left corner of the screen it’s important to set both it’s pivot and the anchor to the bottom-left corner of the element that way it the element will retain it’s distance from bottom-left corner with different resolutions even when it’s resized.
For floating elements like the one in picture above that you want to display at the center of the screen it’s best to set the pivot and the anchor to center. For Windows, Pop-ups and dialog boxes it’s advisable to avoid using stretched anchors on parent elements like a plague. Stretched anchors tend to cause a lot of unnecessary problems with different resolutions and aspect ratios and it’s generally better option to allow the user to resize the windows themselves rather than try to figure out what they want.
Anchors
One should learn to love anchors in Unity when creating elements for your user interface in unity. The help immensely when you want to position the element relative to center, corner or side of the screen without having to deal with screen-width and screen-height calculations to know where you should position the element on different resolutions. However the best thing about them is how they do not only work under the canvas but other Rect Transforms as well which makes structuring UI elements a lot easier.
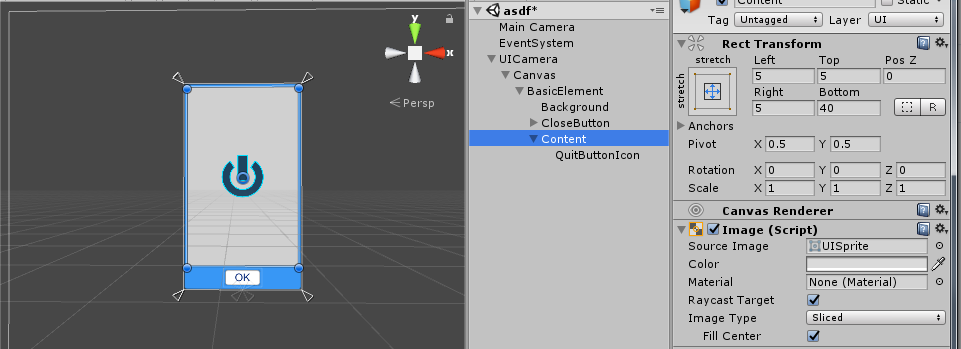
For example here I am using the “4-way stretch” anchor to specify the size of the content with small padding on the top, left and right side of the element. I have also specified the content to give the CloseButton 40 pixels of space from the bottom. Now the element could be freely resized as long as it’s at least 50 pixels or so in height.
You could also specify other sections of your element the same way I specified the content. E.g you could use the top-left top-right stretch to specify 40 pixels in height section as a header or bottom-left and bottom-right stretch to replace the area reserve for close button as footer section of the element. These can make modifying the elements during production a lot easier and reduce the amount of rework that might be needed with the user interface.
Pivots
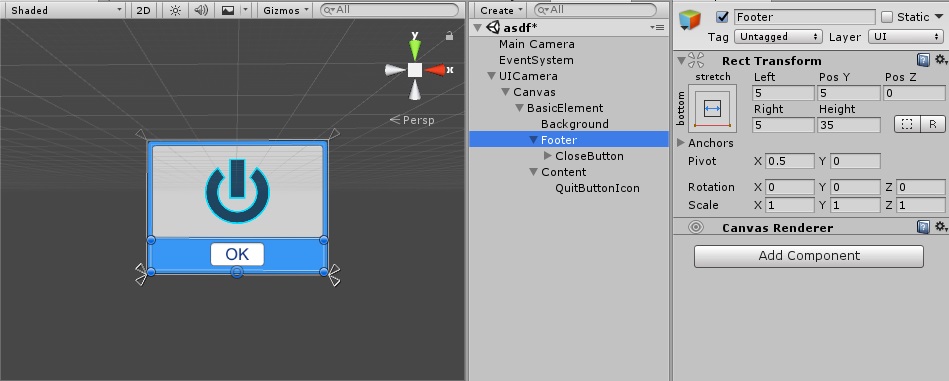
So I made some modifications and made a footer section to the element which now contains the CloseButton that is now centered to the footer section.
Notice how the pivot-y of the footer is zero? This means that the position of the footer element is now based on the bottom-center which makes it easy to modify it’s width and height without having to constantly re-position it because of the change in dimensions.
Proper pivots with anchors also help a lot when you want to animate the elements. For example if you want to hide a certain element by re-positioning it off-screen to the right you could do it fairly easy with unity animations as you could just change the objects pivot during the animation to left-center and it’s anchor to right-side of the canvas and set the position-x to zero.
